System Update Configuration
Change the Windows Update Server
If the default Windows Update server is slow, or if you use an Alibaba Cloud or Tencent Cloud server, you can switch to a different Windows Update server.
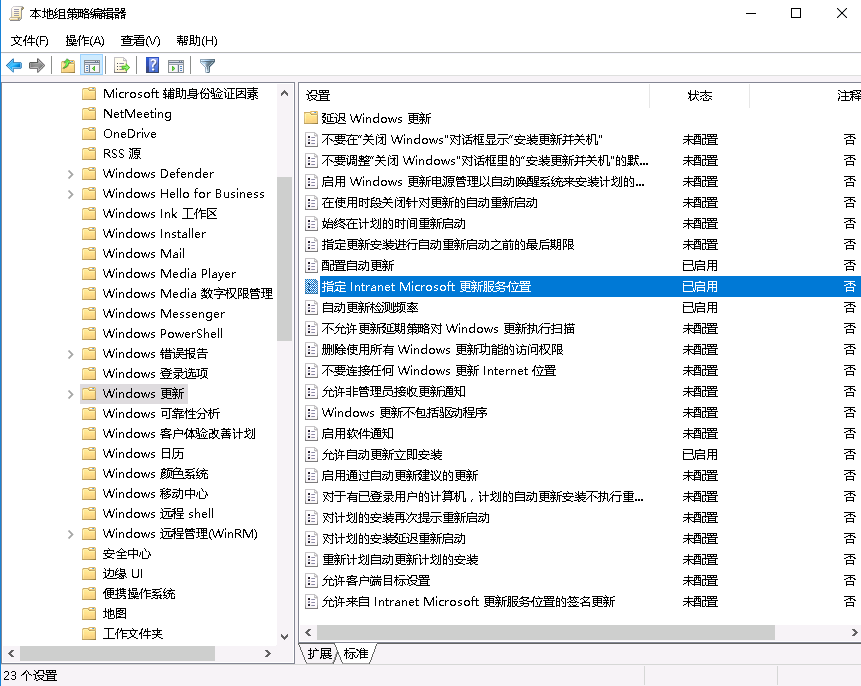
Right-click the Start menu icon, select “Run,” and enter gpedit.msc. Navigate to “Computer Configuration” – “Administrative Templates” – “Windows Components” – “Windows Update,” then double-click “Specify intranet Microsoft update service location”:
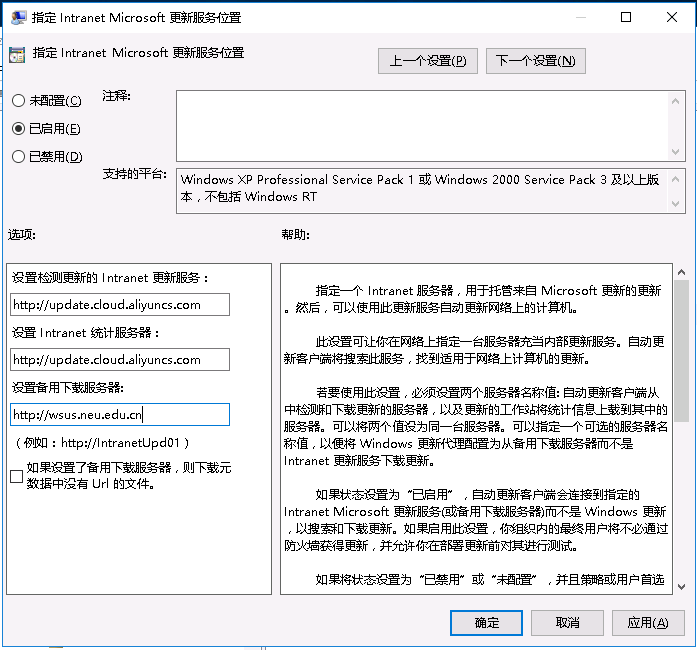
Select Enabled, then configure the intranet update service for detecting updates and the statistics server. For Alibaba Cloud Classic Network, use http://windowsupdate.aliyun-inc.com; for Alibaba Cloud VPC, use http://update.cloud.aliyuncs.com; for Tencent Cloud, use http://windowsupdate.tencentyun.com. Set the alternate download server to http://wsus.neu.edu.cn.
Enable and Allow Automatic Updates
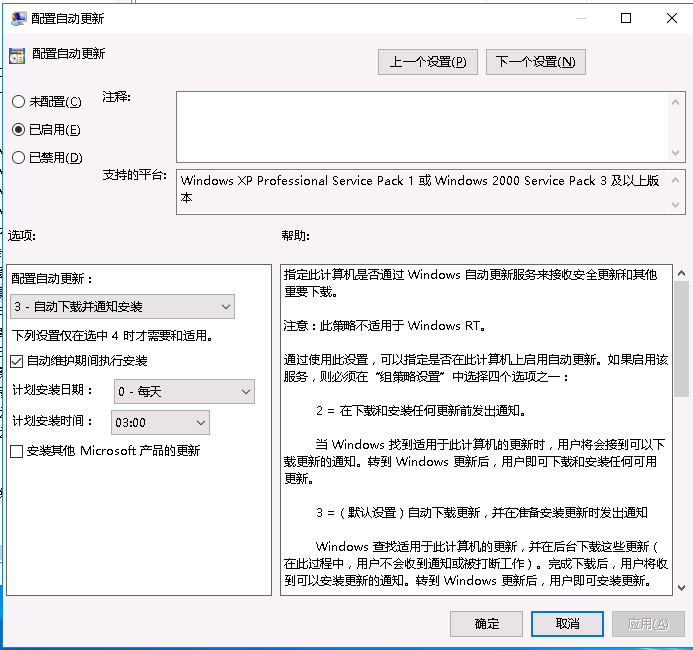
Double-click “Allow Automatic Updates immediate installation” and select “Enabled” to enable automatic updates. Then double-click “Configure Automatic Updates,” select “Enabled,” and choose “Auto download and notify for install,” as shown below:
After completing the two steps above, run the following command as an administrator:
gpupdate /force
Cmd
Copy
Resolve Errors 0x8024401f and 0x8024401c During Automatic Updates
After completing the steps above, open the Start menu – Settings and check for updates to verify that updates work correctly.
If error 0x8024401f or 0x8024401c occurs, run the following commands as an administrator:
-
net stop wuauserv
-
reg delete HKEY_LOCAL_MACHINE\SOFTWARE\Policies\Microsoft\Windows\WindowsUpdate
-
net start wuauserv
Cmd
Copy
System Account Security
Configure Account Security Policies
Enter secpol.msc in “Run” to open “Local Security Policy,” then configure the following settings:
(1) “Account Policies” – “Password Policy”
Set appropriate password complexity requirements to strengthen passwords. Suggested settings are shown below:

(2) “Account Policies” – “Account Lockout Policy”
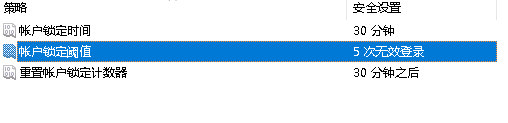
Set the account lockout duration after failed password attempts. You must configure “Account lockout threshold” before configuring the other two settings. Suggested settings are shown below:
(3) “Local Policies” – “Security Options”
Set “Interactive logon: Do not display last user name” to “Enabled.”
Review and Optimize User Accounts
After configuring account security settings, review the system’s user accounts. Enter compmgmt.msc in “Run” to open “Computer Management.” Under “System Tools” – “Local Users and Groups” – “Users,” check for unused accounts and delete or disable them. Also run the net user command at the command prompt to check for unnecessary accounts, as some accounts may be hidden in Computer Management. Use net user <username> /del to delete an account.
Rename the default Administrator account. Setting a new administrator password is also recommended.
Disable Automatic Logon
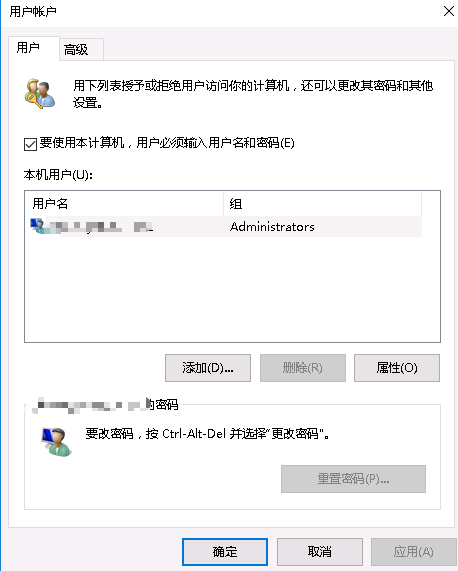
Require a password to log on when the system resumes from hibernation. Enter control userpasswords2 in “Run” to open “User Accounts,” then enable “Users must enter a user name and password to use this computer.”
Remote Access Security
Change the Default Remote Desktop Port 3389
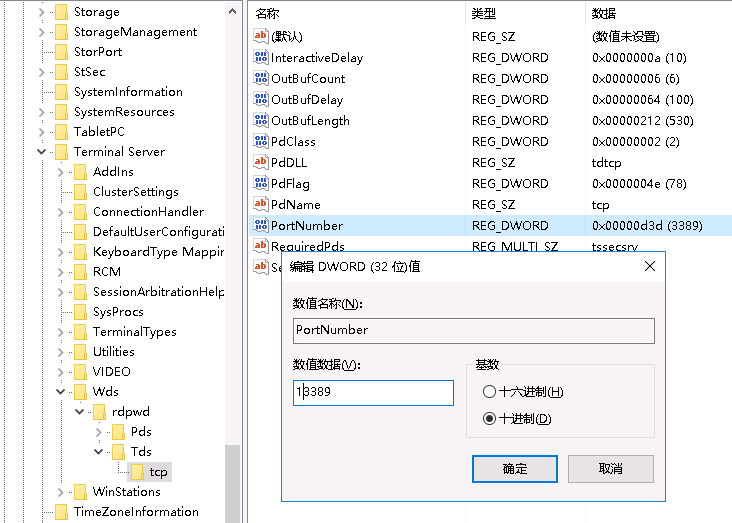
Change the default Remote Desktop port from 3389 to another port. Run regedit to open Registry Editor. Modify the following two registry locations:
HKEY_LOCAL_MACHINE\System\CurrentControlSet\Control\Terminal Server\Wds\repwd\Tds\tcp
HKEY_LOCAL_MACHINE\SYSTEM\CurrentControlSet\Control\TerminalServer\WinStations\RDP-Tcp
At each location, change the PortNumber value in the right pane to the new port number. Setting the base to Decimal is recommended:
Close Registry Editor and restart the server for the changes to take effect. If a firewall is configured, add the new port to its allowlist.
Restrict Remote Shutdown, Local Shutdown, and User Rights to the Administrators Group
Enter secpol.msc in “Run” to open “Local Security Policy,” then navigate to “Local Policies” – “User Rights Assignment.”
(1) In the right pane, double-click “Force shutdown from a remote system.” Keep only the Administrators group and remove all other user groups.
(2) In the right pane, double-click “Shut down the system.” Keep only the Administrators group and remove all other user groups.
(3) In the right pane, double-click “Take ownership of files or other objects.” Keep only the Administrators group and remove all other user groups.
Restrict Remote Logon to a Specific Administrator Account
Specifying an individual administrator account instead of the Administrators group strengthens logon security. Even if an account is created in the Administrators group by exploiting a vulnerability, it will not be able to log on to the system.
Enter secpol.msc in “Run” to open “Local Security Policy,” then navigate to “Local Policies” – “User Rights Assignment.” In the right pane, double-click “Access this computer from the network” and remove all user groups. Click “Add User or Group…,” then “Advanced,” and then “Find Now.” Select the administrator account from the search results, then click “OK” in each dialog to save the settings.
System Network Security
Disable Unnecessary Services
Run the services.msc command in the Run dialog to open Services. Depending on your requirements, consider disabling the following services:
Application Layer Gateway Service (Provides support for application-level protocol plug-ins and enables network/protocol connections)
Background Intelligent Transfer Service (Transfers files in the background using idle network bandwidth. If this service is disabled, features such as Windows Update and MSN Explorer cannot automatically download programs and other information)
Computer Browser (Maintains an updated list of computers on the network and supplies this list to computers designated as browsers)
DHCP Client
Diagnostic Policy Service
Distributed Link Tracking Client
Distributed Transaction Coordinator
DNS Client
Print Spooler (Manages all local and network print queues and controls all print jobs)
Remote Registry (Enables remote users to modify registry settings on this computer)
Server (Can be disabled if file sharing is not required. Once disabled, the Sharing tab will no longer appear when you right-click a drive and select Properties)
Shell Hardware Detection
TCP/IP NetBIOS Helper (Provides support for NetBIOS over TCP/IP (NetBT) and NetBIOS name resolution for network clients, enabling users to share files, print, and log on to the network)
Task Scheduler (Enables users to configure and schedule automated tasks on this computer)
Windows Remote Management (Port 47001; a Windows remote management service used with IIS to manage hardware, generally not required)
Workstation (Creates and maintains client network connections to remote services. If this service is stopped, these connections will be unavailable)
Disable the “Sync Host_xxx” Service
Windows 2016 includes a service named “Sync Host_xxx,” where xxx is a number that varies by server. Disable it manually as follows:
First, run regedit in the Run dialog to open Registry Editor. Under HKEY_LOCAL_MACHINE\SYSTEM\CurrentControlSet\Services, locate the four keys OneSyncSvc, OneSyncSvc_xxx, UserDataSvc, and UserDataSvc_xxx. Change the start value in each key to 4, close Registry Editor, and restart the server.
Disable IPC Sharing
If you stopped and disabled the Server service above, IPC sharing will no longer be available. Running the net share command will display “The Server service is not started.” Otherwise, default shares such as C$ and D$ may appear. Use a command such as net share C$ /del to delete them.
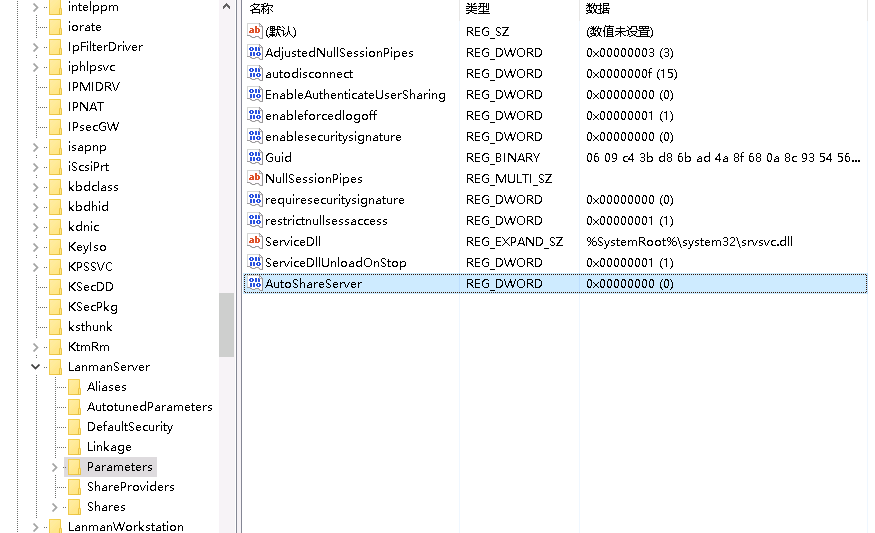
In Registry Editor, locate HKEY_LOCAL_MACHINE\SYSTEM\CurrentControlSet\Services\lanmanserver\parameters. Right-click an empty area in the right pane, select “New” > “DWORD Value,” name it AutoShareServer, and set its value to 0.
Close Port 139 (NetBIOS Service), Port 445, and Port 5355 (LLMNR)
(1) Close Port 139
Open “Control Panel” > “View network status and tasks,” then click “Change adapter settings” on the left. In Network Connections, double-click the active network adapter, click “Properties,” and double-click “Internet Protocol Version 4 (TCP/IPv4).” In the window that opens, click “Advanced” in the lower-right corner, select the “WINS” tab, and select “Disable NetBIOS over TCP/IP” under “NetBIOS setting.” Click “OK” in each dialog to confirm.
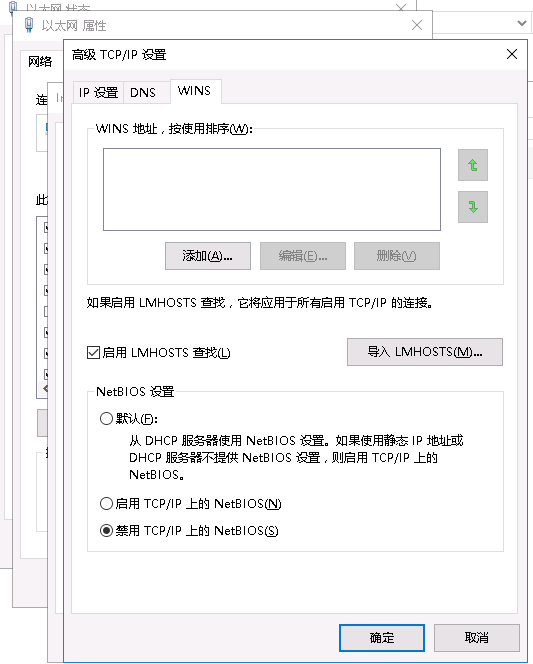
Disabling this feature disables all sharing services on your server. Other users will no longer see your shared resources in File Explorer, helping prevent information disclosure.
(2) Close Port 445
Port 445 is the service port used by NetBIOS to resolve computer names on a local area network. Servers generally do not need to expose shares to the LAN, so this port can be closed. Open Registry Editor and navigate to HKEY_LOCAL_MACHINE\SYSTEM\CurrentControlSet\Services\NetBT\Parameters. Right-click in the right pane, select “New” > “DWORD Value,” name it SMBDeviceEnabled, and set its value to 0.
(3) Close Port 5355 (LLMNR)
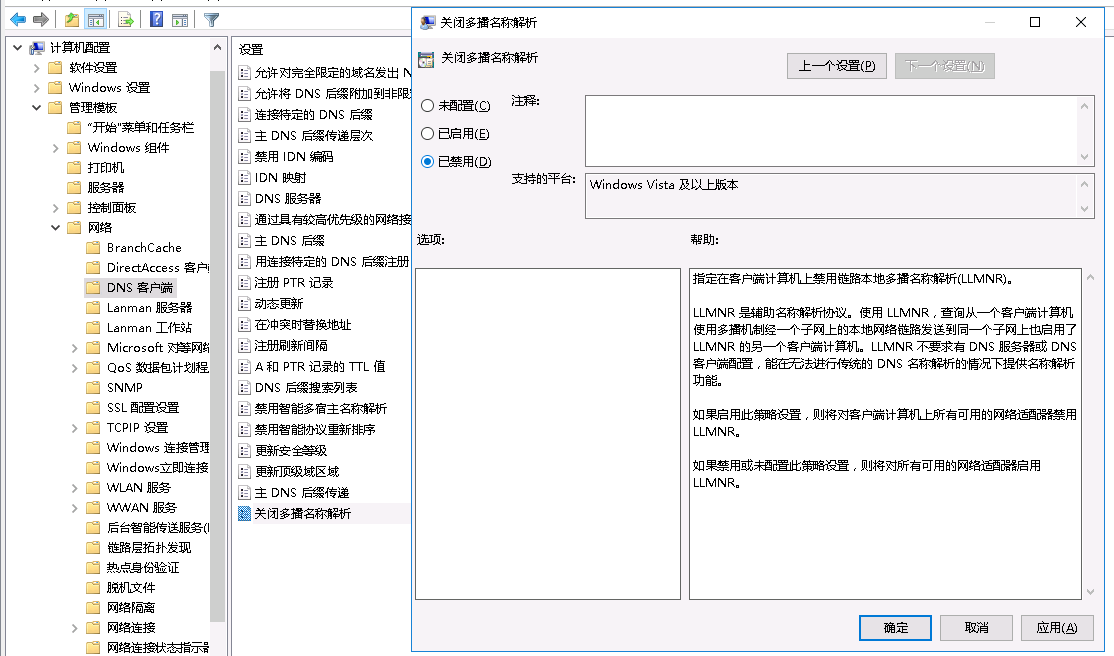
LLMNR (Link-Local Multicast Name Resolution), also called multicast DNS, resolves names on the local network segment and can be disabled through Group Policy. Open the Run dialog and enter gpedit.msc to open Local Group Policy Editor. Navigate to “Computer Configuration” > “Administrative Templates” > “Network” > “DNS Client.” In the right pane, double-click “Turn off multicast name resolution” and set it to “Disabled.”
Restrict Network Access
Run secpol.msc in the Run dialog to open Local Security Policy. Navigate to “Security Settings” > “Local Policies” > “Security Options” and configure the following policies:
Network access: Do not allow anonymous enumeration of SAM accounts: Enabled
Network access: Do not allow anonymous enumeration of SAM accounts and shares: Enabled
Network access: Let Everyone permissions apply to anonymous users: Disabled
Accounts: Limit local account use of blank passwords to console logon only: Enabled
After configuring these settings, run gpupdate /force in an administrator command prompt to apply them immediately.
Log Auditing
Enhance Logging
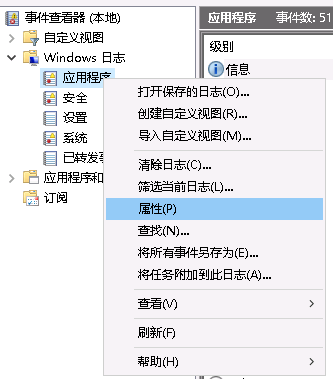
Increase the log size to prevent incomplete logging caused by insufficient log file capacity. Run eventvwr.msc in the Run dialog to open Event Viewer. Expand “Windows Logs,” then right-click “Application,” “Security,” and “System” in turn. Select “Properties” and change “Maximum log size” to 20480 for each log.
Enhance Auditing
Record system events to support troubleshooting and auditing if issues arise later. Run secpol.msc in the Run dialog to open Local Security Policy. Navigate to “Security Settings” > “Local Policies” > “Audit Policy.” The following settings are recommended:
Audit policy change: Success
Audit logon events: Success, Failure
Audit object access: Success
Audit process tracking: Success, Failure
Audit directory service access: Success, Failure
Audit system events: Success, Failure
Audit account logon events: Success, Failure
Audit account management: Success, Failure
After configuring these settings, run gpupdate /force in the Run dialog to apply them immediately.
Enable and Configure the Firewall
If you use a cloud server, such as Alibaba Cloud or Tencent Cloud, your cloud provider offers a firewall tool, typically at the routing level. These tools are easier to use, and configuration mistakes will not lock you out of the server. Using the cloud provider’s firewall is therefore recommended as the preferred option.
Turn Windows Firewall On or Off
Open “Control Panel” > “System and Security” > “Windows Firewall.” Select “Turn Windows Firewall on or off” on the left, then turn it on or off as required. If you use your cloud provider’s firewall, disabling Windows Firewall is recommended. Note: Before enabling the firewall, allow access to the remote login port; otherwise, your remote connection will be interrupted!
Allow Access to Specific Ports
The following example uses Windows Firewall; cloud provider firewall rules are similar. The firewall must be enabled. Run WF.msc in the Run dialog to open Windows Firewall with Advanced Security. Click “Inbound Rules” on the left, then “New Rule…” on the right to open the New Inbound Rule Wizard. Select “Port” and click “Next.” Select “TCP” as the port type, select “Specific local ports,” and enter the configured remote login and web ports, for example: 80, 433, 3389. Click “Next,” select “Allow the connection,” and click “Next” again. Select all options and click “Next.” Finally, enter a rule name, such as “Allow Remote Connections and Web Services,” and click “Finish” to save.
Block ICMP (Disable Ping)
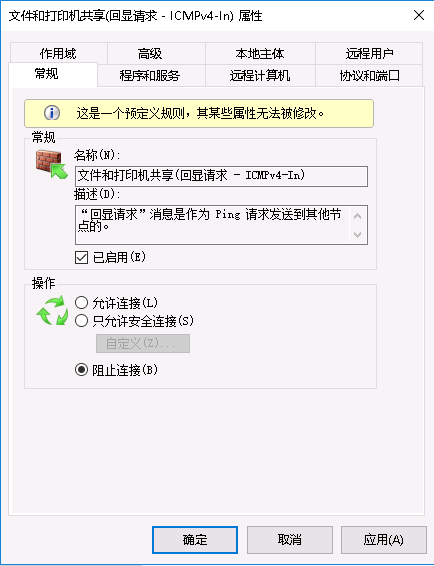
Follow the steps above to open Windows Firewall with Advanced Security and select “Inbound Rules” on the left. Among the default rules, double-click “File and Printer Sharing (Echo Request – ICMPv4-In).” On the “General” tab, select “Enabled,” then select “Block the connection” under “Action.” Click “OK” to save.
Other Security Settings
Configure a Screen Saver to Prevent Local Attackers from Directly Regaining Desktop Access
Open “Control Panel” > “Appearance and Personalization” > “Personalization” > “Screen Saver.” Select a screen saver, select “On resume, display logon screen,” and set the wait time to 10 minutes.

Disable Windows AutoPlay
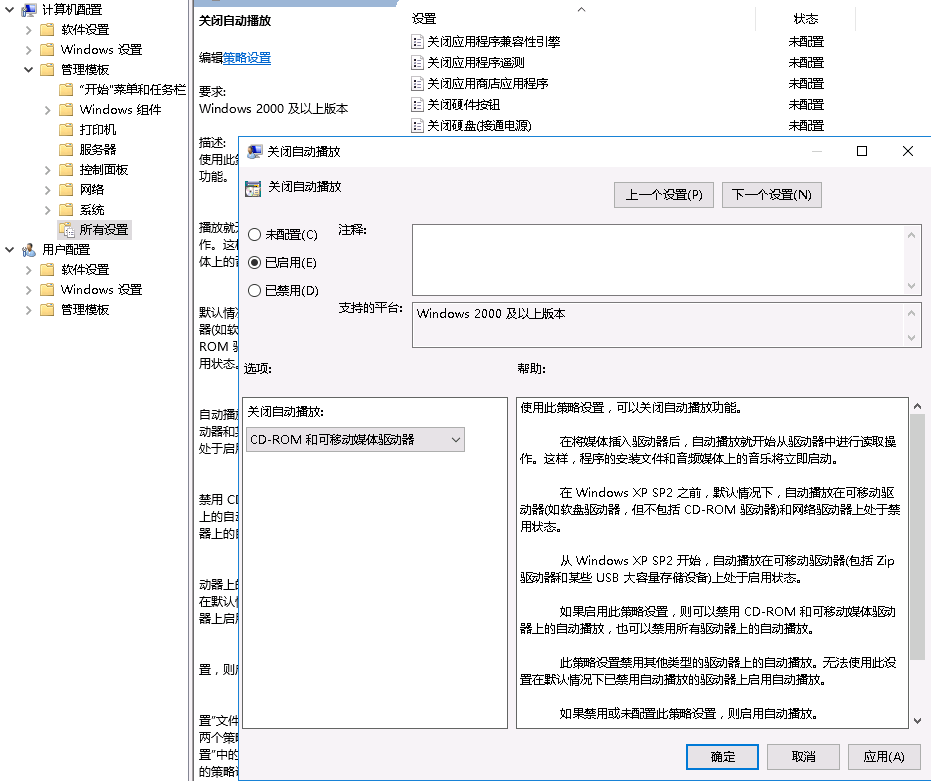
Run gpedit.msc in the Run dialog box, then navigate to “Computer Configuration” > “Administrative Templates” > “All Settings”. Double-click “Turn off AutoPlay” and select “Enabled”.