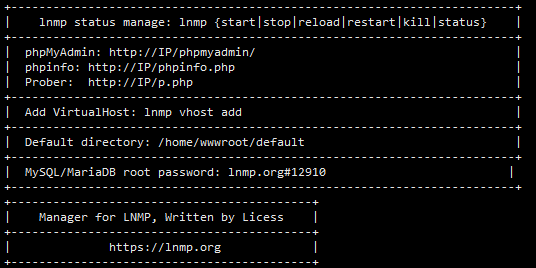
Installation Requirements:
- CentOS/RHEL/Fedora/Debian/Ubuntu/Raspbian/Deepin/Aliyun/Amazon/Mint Linux distributions
- At least 5GB of free disk space; at least 9GB free for MySQL 5.7 or MariaDB 10
- At least 128MB of RAM (for 128MB low-memory VPS: Xen requires SWAP; OpenVZ requires at least 128MB of vSWAP or burstable memory). Note: do not use a 64-bit system on low-memory machines!
- Installing MySQL 5.6 or 5.7, or MariaDB 10 requires at least 1GB of RAM; higher versions require at least 2GB of RAM!.
- Installing PHP 7 or above requires at least 1GB of RAM!.
- The VPS or server must have working yum or apt-get repositories configured. For offline installation, add the CheckMirror=n parameter!
- Linux is case-sensitive — be careful when entering commands!
- If MySQL/MariaDB was installed via yum or apt-get, back up your data and related files yourself!
- CentOS 5 and 6, and Debian 6 and earlier are no longer supported by their official sites and cannot be used directly — you must switch to vault or archive repositories yourself!
- For CentOS 6, please install using lnmp 1.8+!
- Ubuntu 18+, Debian 9+, Mint 19+, Deepin 15.7+ and all newer Linux distributions can only be installed using version 1.7+!
- PHP versions below 7.1.* do not support very new Linux distributions such as Ubuntu 19+ and Debian 10!
- The Alibaba Cloud Ubuntu 14.04 system image is broken — do not use it!!!
- Upgrading to or installing PHP 7.4 requires CentOS 7+, Debian 8+, or Ubuntu 16.04+, and must use version 1.7+!!!
- Upgrading to or installing MySQL versions below 8.0.23 requires CentOS 8+, Debian 9+, or Ubuntu 16.04+, and must use version 1.7+!!!
- Upgrading to or installing MySQL 8.0.24 and above requires Debian 11+, Ubuntu 20.04+, or Fedora 33+, and must use version 1.8!!!
Installation Steps:
1. Log in to your VPS or server using PuTTY or a similar SSH tool;
After logging in, run: screen -S lnmp
If you see the error “screen: command not found”, you can install it with: yum install screen or apt-get install screen. For details, see the screen tutorial.
2. Download and install the LNMP one-click installation package:
You can choose the download edition (recommended for VPS users in the US and overseas, or for users with limited disk space) or the full edition (recommended for users in mainland China — a China-based download mirror is available on the download page). There is no functional difference between the two; the full edition simply bundles the required source files into the package in advance.
Install the LNMP stable release
For an unattended installation, use the unattended command generator, or read the unattended installation tutorial.
wget http://soft.vpser.net/lnmp/lnmp1.8.tar.gz -cO lnmp1.8.tar.gz && tar zxf lnmp1.8.tar.gz && cd lnmp1.8 && ./install.sh lnmp
To install LNMPA or LAMP instead, simply replace the lnmp parameter after ./install.sh with lnmpa or lamp. Standalone installation of Nginx or the database is also supported, using ./install.sh nginx or ./install.sh db. If you need to change the website and database directories, customize Nginx parameters or PHP modules, enable lua, etc., edit the lnmp.conf file in the installation package directory before running ./install.sh. For details, see the lnmp.conf parameter documentation.
If you see “wget: command not found”, install it with yum install wget or apt-get install wget.
If the download is slow or fails, switch to another download node. See how to change the LNMP download node.
After running the LNMP installation command above, you will see the following prompt:
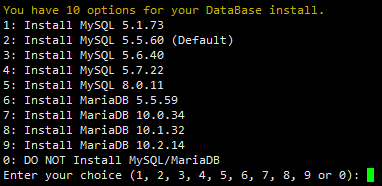
Multiple MySQL and MariaDB versions are offered, along with an option not to install a database. Note that MySQL 5.6, 5.7, and MariaDB 10 require at least 1 GB of RAM! To install only the database, run ./install.sh db from the lnmp installation package directory.
Enter the number corresponding to your desired MySQL or MariaDB version, then press Enter to proceed.

Set the MySQL root password (for security, pressing Enter without typing anything will set it to lnmp.org# followed by random digits). If you make a typing mistake and need to delete a character, hold Ctrl and press Backspace (in some cases Backspace alone works). Press Enter to proceed, as shown below:

You will be asked whether to enable MySQL InnoDB. The InnoDB engine is enabled by default and is generally recommended — press Enter or type y. If you are sure you do not need this engine, type n (InnoDB cannot be disabled on MySQL 5.7+). Press Enter to proceed.
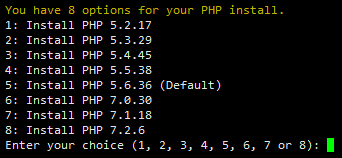
Note: when selecting PHP 7+, you must verify that the PHP version is compatible with your application.
Enter the number of the PHP version you want, press Enter, and then choose whether to install a memory optimization allocator:
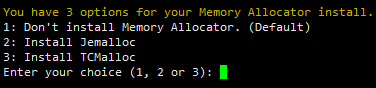
You can choose none, Jemalloc, or TCmalloc. Enter the corresponding number and press Enter — pressing Enter directly selects the default of not installing one.
If installing LNMPA or LAMP, you will also be prompted to set an email address and choose Apache  “Please enter Administrator Email Address:” — set the administrator email, which will be shown on error pages when errors occur.
Then select the Apache version.
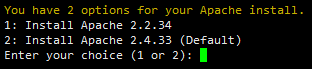
Enter the number in front of the desired version as prompted, then press Enter.
When you see “Press any key to install…or Press Ctrl+c to cancel”, press Enter to confirm and start the installation.
The LNMP script will automatically compile and install Nginx, MySQL, PHP, phpMyAdmin, and related components.
The installation may take anywhere from tens of minutes to several hours, depending mainly on the machine’s specifications and network speed.
3. Installation complete
If you see Nginx: OK, MySQL: OK, PHP: OK
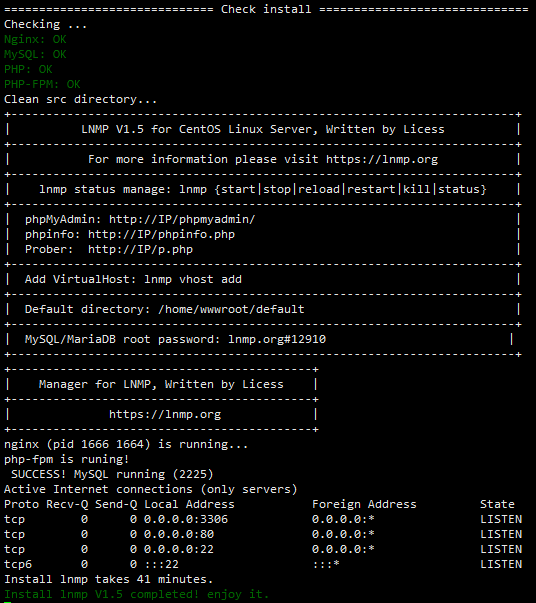
and Nginx, MySQL, and PHP are all running, ports 80 and 3306 are listening, and the message shows the installation time along with “Install lnmp V1.6 completed! enjoy it.”, the installation has succeeded.
On some systems the installer may hang at “Install lnmp V1.5 completed! enjoy it.” without exiting automatically — press Ctrl+c to exit.
Once the installation is complete, you can start using it right away. Follow the virtual host setup tutorial. After adding a virtual host, you can upload your website code via SFTP or an FTP server, then point your domain’s DNS records to the VPS or server IP. Once the DNS resolution takes effect, your site is ready to use.
4. Installation failure

If you see a message similar to the image above, with one or more components failing to install, the installation has failed! Use WinSCP or a similar tool to download the lnmp-install.log file from the /root directory, then post on the LNMP support forum stating your OS distribution name and version, whether it is 32-bit or 64-bit, and upload the lnmp-install.log as a compressed attachment. We will investigate the error through the log and provide a corresponding solution.
By default, LNMP does not install an FTP server. If you need one: https://lnmp.org/faq/ftpserver.html
5. Adding/removing virtual hosts and URL rewrite management
https://lnmp.org/faq/lnmp-vhost-add-howto.html
6. Installing eAccelerator, XCache, Memcached, ImageMagick, ionCube, Redis, and OPcache
https://lnmp.org/faq/addons.html
7. Directories and file locations of LNMP-related software
https://lnmp.org/faq/lnmp-software-list.html
8. LNMP status management commands
https://lnmp.org/faq/lnmp-status-manager.html
9. Installing only the database or Nginx
Starting from lnmp 1.5, installing only the MySQL/MariaDB database or only Nginx is supported.
Standalone Nginx installation added — run ./install.sh nginx from the installation package directory.
Standalone database installation added — run ./install.sh db from the installation package directory.
10. The lnmp one-click installation package supports fully offline installation
Offline installation tutorial for CentOS: https://www.vpser.net/manage/centos-iso-local-yum-repository.html
The process is similar on Debian/Ubuntu distributions.
11. Uninstalling the lnmp one-click installation package
Run ./uninstall.sh from the lnmp installation package directory. Select the current environment type as prompted and press Enter to confirm. This will remove the lnmp-related program components; website files will be kept, and the database directory will be additionally backed up under /root. Back up any other files you need before uninstalling.
Article sourced from: https://lnmp.org/install.html