(Original article by Siwenlide. Please notify us in advance before reposting.)
As enterprises make extensive use of systems such as ERP, SAP and CRM, employees frequently need to access corporate business systems securely from outside the office. The VPN client built into Windows makes it possible to dial in to the company firewall safely and conveniently. However, once an employee establishes a VPN connection, all network traffic is forwarded through the VPN tunnel to the company firewall. When many clients are connected, this consumes a large share of the company’s internet egress resources, and the connection speed of employees working remotely suffers as a result.
The method below solves this problem by splitting traffic automatically, so that only traffic destined for the company’s internal network is forwarded through the VPN tunnel:
For example, the internal IP used by the company firewall is 192.168.10.0/24 (employees working remotely should avoid using the same IP address for their local gateway, otherwise the configuration will not take effect)
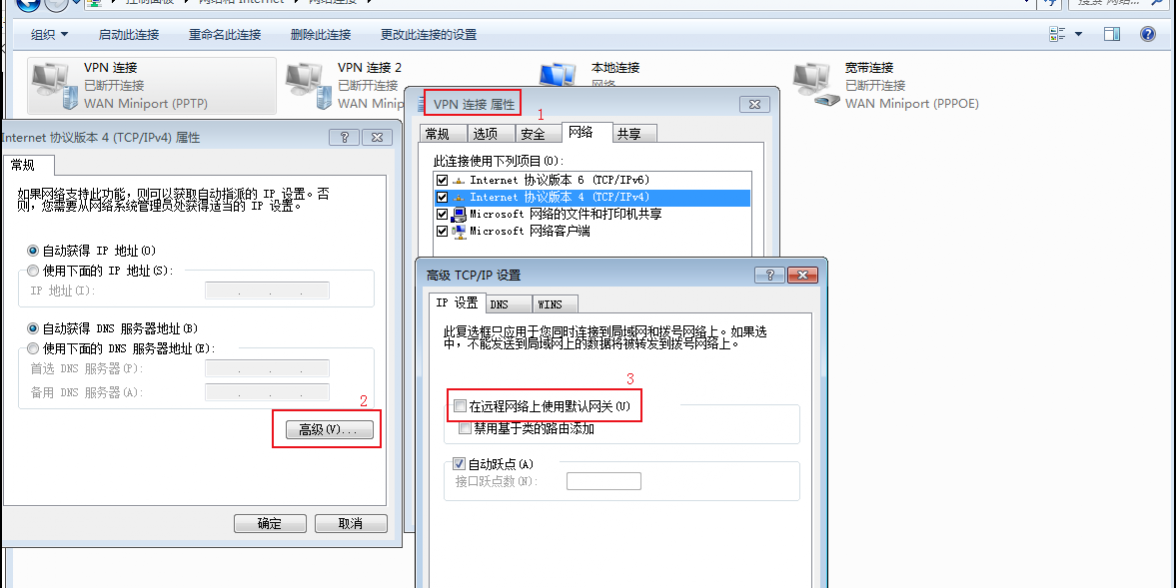
In Windows 10, go to Control Panel – Network and Sharing Center – Change adapter settings, find the VPN connection you have already created, and follow the steps in the figure below to clear “Use default gateway on remote network”

After this change, no traffic will go through the VPN tunnel. The following describes how to add a static route so that traffic destined for the company’s 192.168.10.0/24 network is forwarded through the VPN tunnel, achieving automatic traffic splitting
Run Windows PowerShell or the Command Prompt (CMD) as administrator
Enter the following command to add a static route:
route add 192.168.10.0 mask 255.255.255.0 10.1.1.1
After the static route is added, all traffic destined for 192.168.10.0/24 will be forwarded through the VPN tunnel.
Note: 10.1.1.1 is the gateway address configured on the company firewall for the VPN tunnel; please consult your company’s network administrator for details;
The static route above will be lost after the computer restarts. Enter the following command to make it permanent (note, however, that when you move to a different environment the IP may conflict with the local network, so update or delete the static route promptly)
route -p add 192.168.10.0 mask 255.255.255.0 10.1.1.1
Additional notes:
1. -p means persistent, so the route remains valid after the system restarts
2. To delete a route: route delete 192.168.10.0
3. To display the routing table: route print
4. Note: on machines with two network adapters, routes serve to open a path between the two adapters, so do not delete routes casually.
5. If you cannot access the internet, manually specify the IP address, subnet mask, gateway and DNS for the local connection.
6. You can verify that the configuration above works by checking your local public egress IP address on a site such as www.ip138.com.
7. You can use tracert to check the egress path of data packets. For example, tracert 192.168.10.1 shows the egress link.